
Welcome back to our beginner's guide to HortiPeMS. In the previous chapters, we walked you through the process of setting up users and pesticides within the system. Now that those essential tasks are complete, we can delve into the true purpose of HortiPeMS: pesticide applications.
In the next three chapters, we'll provide a comprehensive overview of pesticide applications within HortiPeMS. We'll cover how to create and document applications, download application records, develop spray recipes, and review your complete application history.
Chapter 5: Create Applications
The cornerstone of HortiPeMS's functionality lies in the accurate recording of pesticide applications. By entering an application within HortiPeMS, all necessary documentation is generated, and the inventory of the used pesticides is automatically adjusted.
To begin, navigate to the "Enter application" section within the menu. This action will open a screen divided into two distinct blocks: "Enter application" and "Recipe."
In the first "Enter application" block, you will input all basic information regarding the application. Please refer to the image below, which has numbers added to each field for further clarification in this article.

In the date (1) and start-time (2) fields, simply enter the date and time the pesticide application will commence. In the end-time field (3), enter the anticipated completion time of the application. The REI (Restricted Entry Interval) countdown will begin after this time.
In the crops field (4), enter the crops that will be treated. Multiple crops can be entered if desired. It's worth noting that applications can be searched by crop later, and the search function will examine all these fields. Therefore, maintaining consistency when describing crops here (such as separating multiple crops with a comma) is recommended.
In the locations field (5), enter the specific areas where spraying will occur. Again, multiple locations can be added with desired granularity (e.g., "Zone A" or "Zone A bed 2").
In the Applicator/supervisor field (6), enter the applicator or supervisor. The default entry here is the currently logged-in user. If a pesticide license number is associated with this user (in the user settings), it will also be printed on the reports where necessary.
If there are any additional applicators (such as an employee without a pesticide application license), they can be entered in the "Additional applicator(s)" field (7).
Now, let's add the essential application details. First, select the appropriate "measurement basis" (8). This choice is important for the reports generated for this application. The default and most common selection is by the amount of water (e.g., if you plan to spray a total of 400 gallons). For field applications, it might be more practical to select "Area" (e.g., 5 acres). For this illustration, let's assume we'll mix 500 gallons of water, so that's what we'll enter in the "Amount of water" (9) field. Note that if "Area" is selected for the measurement basis, you'll be prompted to enter the number of acres to be treated.
Next, we'll add all the pesticides to be applied. In the next chapter (Chapter 6), we'll explain how to create spray recipes, which will add multiple pesticides and their rates simultaneously. For now, we'll add them individually.
Click on the "add pesticide" (10) button. This will generate a popup where you can select a pesticide (which has been previously saved to your account, as described in Chapter 3 or Chapter 4) and specify its rate.
For this example, let's assume we would like to apply:
- Daconil: 1,4LB per 100 gallon
-
Subdue: 1 oz per 100 gallon

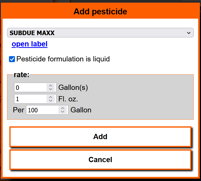
When you are not sure about the rate, you can click on “Open label” after selecting a pesticide. This will open the pesticide label selected as default in the labels section (as described in chapter 4). When you make a mistake, you can remove the pesticide from the recipe block, and add the correct one. The “Area treated” (11), “Notes” (12) and “Comments” (13) are optional fields in which you can enter some more information. After all the information is entered, you can see if everything looks correct in the Recipe block. In this block you can see the total amount of pesticide which will be used, or you can remove it by clicking “remove”. If you rather see the measurements in the metric system. If everything looks good, click on “Save application” (14). The following screen will, again, show 2 blocks. 1 with the general application information(“Application report”) and one with the recipe information (“Mixing recipe”). In the application report section you an choose to edit an application (1), delete an application (2) or print an application (3). Some states require this printed report to be displayed in a public place. The mixing recipe can be printed (4), so it can be handed out to the person who will be responsible for mixing the pesticides.

Chapter 6: Create Recipes
In HortiPeMS, it's possible to create recipes – a convenient way to store a collection of pesticides with preset rates. This eliminates the need to add each pesticide individually (as detailed in Chapter 5) when you want to apply them. Recipes are particularly useful for rotation applications or mixes of certain pesticides that are consistently used together. This chapter is divided into two subchapters: Chapter 6.1 will explain how to create recipes, while Chapter 6.2 will delve into how to use recipes in applications.
Chapter 6.1: Creating Recipes
To create recipes, begin by clicking on "recipes" in the left menu. This will open the recipe page. If you haven't created any recipes yet, it will indicate that you have no saved recipes. To add a recipe, click "add recipe."
A new screen will pop up, as shown in the picture below. In this popup, you need to enter a name for the application (1). This can be any name and will only be used to identify the recipe. The "target pests (2)", "PPE (3)", and "Comments (4)" fields are optional. The target pests and comments fields will be copied to an application when you use this recipe in that application.
To add a pesticide to the recipe, click the "Add pesticide (5)" button. Select the pesticide you would like to add, enter the rate per 100 gallons of water, and click add. For this example, I created a recipe (with Subdue and Medallion), as seen in the picture below. When you are satisfied with the recipe, click "Add recipe (6)".

After adding the recipe, you'll see it listed in the table with all your other recipes. If the price and REI (Restricted Entry Interval) are set for each pesticide within a recipe, they will be displayed here as well. If not, an asterisk (*) will indicate that the information is missing. In this table, you can click on a recipe to adjust or remove it. Please see the picture below for an example where the price and REI are not entered for all chemicals yet.

Chapter 6.2: Creating an Application with a Recipe
Applying a premade recipe is nearly identical to creating a normal application (as described in Chapter 5). The only difference is that instead of clicking "add Pesticide," you'll click "Add recipe," the circled button in the image below.

This will display a popup (as seen below), where you can select a recipe from the dropdown menu (1). Once a recipe is selected, its ingredients will be shown in the recipe information box. You can also choose to remove any pesticides already added to this application by checking the corresponding checkbox (2). This can be helpful if you've already added pesticides to the application using the "add pesticide" button and you wish to exclude them from this particular application. When everything looks satisfactory, you can click "Add" (3).

Now, all the pesticides from that recipe have been added to the application. As illustrated in the picture below, it appears the same as if you had added all the pesticides individually, except this method saved you time! You'll also notice that the target/disease/pests notes from the recipe have been copied to the application.

Please note that it is possible to remove or add more pesticides (or recipes), after adding a recipe.
Chapter 7: View your Application History
After a while, you'll have accumulated hundreds or even thousands of applications stored within HortiPeMS. In this chapter, we'll show you how to locate any specific application and generate customizable reports.
This chapter is divided into three subchapters:
- Chapter 7.1 will explain how to navigate the application history table.
- Chapter 7.2 will describe how to filter and search this table.
- Chapter 7.3 will explain how to download reports that suit your specific needs.
Chapter 7.1: Navigating the Application History Table.
To access all your historic applications, click on the "Application history" button in the lefthand main menu. This will display the application table, which should resemble the image below (except that the specific entries in the table may vary). This table shows the application date, crops and locations, pesticides applied, REI (Restricted Entry Interval), and the applicator. In our example, we've only added two applications so far. However, as you add more applications, this table will naturally grow longer.

The table is sorted by the application date, with the newest applications appearing first and at the top of the table.
You can click on any of the applications in this table, which will take you to the detailed application report (as seen after adding an application in Chapter 5), which you can also print again if needed.
Chapter 7.2: Filtering the Application History Table
As you accumulate more applications, locating a specific one might become challenging, especially if you have years of data stored within HortiPeMS. To simplify this process, you can filter the list. To do so, click on the "Filter" button below the table. This will open a popup similar to the one shown in the picture below.

In this filter, you can select three filter criteria:
- Between specific dates: Use the "In between dates" section to filter applications within a specified date range.
- Containing crops: Use the "Containing crops" section to filter applications based on specific crops.
- Containing location: Use the "Containing location" section to filter applications based on specific locations.
If a field is left blank (or "mm/dd/yyyy" in the date fields), it will be ignored in the search/filter.
All fields work in conjunction. This means that if you enter "vinca" in the "Containing crops" section and "Zone C" in the "Containing location" section, it will only find applications made to vinca in Zone C. If you leave the "Containing location" field empty, it will find all applications made to vinca, regardless of the location.
For instance, if you'd like to download a report of all applications made in 2023, you can set the "In between dates" to "01/01/2023" and "12/31/2023" and leave all other fields empty (as shown in the picture below).

Once you've entered all the criteria, click "Filter." You'll be returned to the application history table, but this time it will only display the applications that match the criteria you specified.
Chapter 7.3: Downloading Reports
It's also possible to download application history reports, which differ from the individual application reports described in Chapter 5. It's crucial to remember that when you download a report from this table, it will incorporate any active filters you've applied, as explained in Chapter 7.2.
When you're ready to generate an application history report, click on the "Download" button located below the table. This will open a popup, as shown in the picture below. In this popup, you can select which fields you'd like to include in your report for each application. The default fields are already checked.

In the "Download as:" section, you have two options, which determine the format of your report:
- *Download as .PDF: This is the default option, and it will create a user-friendly, readable report. Any system can open this file, and it will always maintain the same appearance. It's also tailored for printing and clarity.
- *Download as .CSV: This option is intended for more advanced users who utilize other programs or personal spreadsheets. When downloaded in this format, it's not easily printable and may appear somewhat confusing. It's designed to serve as import data for other programs.
Once you've selected the desired options, click "Download." Your browser settings will then determine the next step (either prompting you to choose a save location or opening the file directly).
And that concludes our exploration of application history reports. Next month, we'll provide a detailed guide on using the inventory management system within HortiPeMS, ensuring you never run out of essential pesticides again!
